Pages

Showing posts with label diy. Show all posts

Monday, March 2, 2015

DIY Key Chains

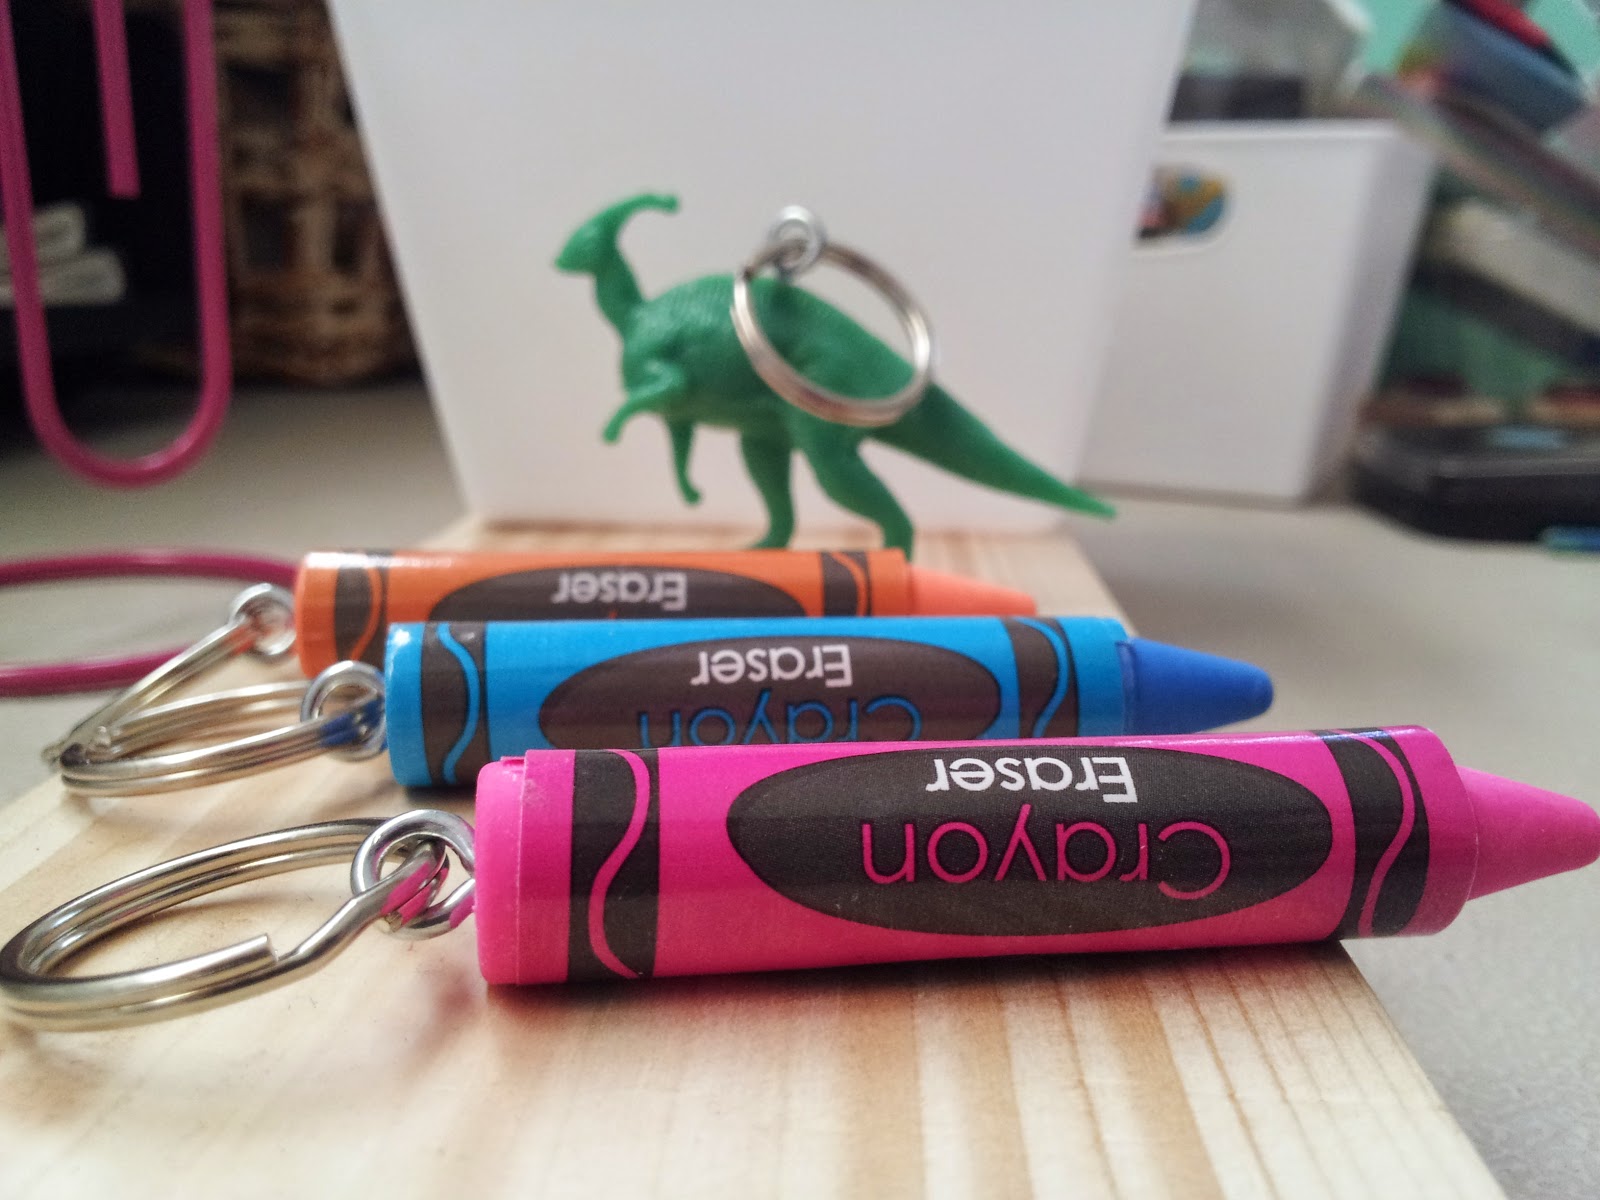
I had so much fun making these key chains from rubber crayon erasers and plastic dinosaurs.
I have had them for a while and didn't know what to do with them and I wanted to make some key chains a few days ago and I saw in front of me the eye screws and I said ta da!!
Really easy and fun to make. The eye screws you can find them pretty much at any hardware store, at the dollar tree, 99 cents only store, Walmart,Target, and the rings I got them at Walmart in their craft section.
Now I want to make more and look for more fun rubber and plastic items that I can easily turn into key chains.


Saturday, January 10, 2015

Dollar Store Mirror Decor


Sometimes I buy things at the dollar store,Michael's or thrift store because they are great finds and I know I will regret not buying it later and it won't be there when I come back for it, and like a lot of the times I am busy and never get around to finishing something or I end up doing another project instead, or if I do finish my projects I forget to post it up on here and I remind myself with post it's on the fridge but someone how they manage to disappear,not my fault I promise he he he.  I am doing better and trying to keep up with my facebook page,Pinterest,Instagram and of course my blog. 
Well enough about excuses, but here is a project you can do with any kind of mirrors you find, the key is the glue especially for glass that you do not want it to fall apart. My secret is the E6000 glue and it dries clear. It is very versatile and I always keep at least two around. These framed mirrors you can find at the dollar tree or 99 Cents Only Stores and the wood letter I picked up at Walmart for less than $1.50 and the Glue too they sale at Walmart or any craft store for under $4.00, just depending where you get it at price may vary. 

You can paint them any color you want, these were white to begin with and still look white but I did apply a coat of a very light gray bluish paint that is very light,but you can not tell in this picture very well. And of course I painted the wood letter to give it a shabby chic look to it. For the letter I primed it first,then I put a coat of like a light ever green acrylic pain color and after that dried I added a light pink coat to the top. Once it all dried up I gave it a quick sand with a sanding sponge to reveal some of the paint beneath to give it taht old look and then I glued the letter using the E6000 Glue and I let the whole thing dry over night. 
The frames actually already come with hanging brackets on the back in case you want to hang it, you won't need to add any,or you can just stand it on a bookcase or on top of the fireplace mantle. Next time you go into a dollar store don't forget to snag a few of the mirrors. 


Thursday, January 8, 2015

Wood Crosses

I love how these wood crosses turned out. I had a client who wanted something handmade and unique and I kept thinking and thinking on what and I asked her what her mom and uncle liked and she said they both like crosses and I already had kindling that I had bought and wood shims that I used. They were not hard to make but it took time to cut,sand,paint,nail and glue a lot of the pieces that went into making these crosses.
She wanted them for Christmas so I had about a week or less to make them but I was more than excited and happy to make them and she loved them which is what matters.


Dollar Store Chalk board tray

Chalk paint is so much fun. It is very versatile and so many things you can turn into a chalk board.
I love trays and I love going to the dollar Tree they carry these trays that look like the real thing but for the fraction of the price.
I simply used the blue painters tape and taped around the center to prevent any of the paint from getting on the outside. for this tray I did two coats of chalk paint and I used Krylon spray paint.

I found these awesome chalk markers at the 99 cent only store and I had to stock up on these because a lot of the times they run out or only carry them for a limited time. With these kind of chalk Markers it is permanent once it dries but it is washable with soapy moist cloth before it dries. Or you can simply use regular chalk. Before I write on these I like to use the flat part of the chalk and gently cover it with the chalk and wipe it off. I don't know the term I forgot what it is called when you apply the chalk all over the chalk board.
This whole project cost me under $3.00 because I had the spray paint on hand, but if you do not they have chalk paint at walmart for under $5.00 a can. I usually get mine at Walmart but If I don't go to the city and won't be going there soon I usually just go to Ace here in town.

Hello and Happy New Year

Well Happy New year hope everyone had a good new year with their loved ones.
We just spent it at home since our daughter got sick but my sister and brother got to come up here with us and spend a few days up on the mountain.
I have been busy the past couple of months and I took a little break, and the Tuesday before New Year’s Eve my little girl got sick. We took her to her doctor’s office and they did a breathing treatment because her oxygen levels were low and her doctor thought she might have phnemonia so we then took her to Children’s Hospital in Los Angeles just to be on the safe side. Upon arrival we checked her in and checked her oxygen level and it was low so they did another treatment. But they finally got her oxygen levels up and she has asthma with an infection. She had the same thing last year right around this time. She has ezcema and some food allergies and allergies to certain environmental factors. We take her regularly for check ups with her amazing Pedetrician dermatologist at UCLA and kids with allergies are more pron to have asthma sometime in their life. The awesome thing is that the doctors their work hand on hand to figure out a plan and what is better for the child. So now we need to get the allergist involved and see if this is going to be a problem yearly when the winter comes around. Living in the city there is more poor air quality. Idealy living on the beach or near the beach would be better but that is not going to happen any time soon. For now we just continue doing what we do to manage her allergies and ezcema.

P15_0ef13bfb-24e4-41d7-86c8-01f13873f393.jpg


                                                      some of the mugs I made my family

A few of the ornaments I made from slotted wood clothespins and craft wood pieces from the dollar tree
and foam balls covered with yarn.


Monday, December 15, 2014

13 days til Christmas boutique

This past Saturday the 13th was the first Christmas boutique held at a local vendors home and my first time selling my items. There wasn't the yearly christmas fair after the parade not sure if we lost a major sponsor. But that did not stop us from the holiday spirit. A very lovely lady was so nice of her to let us use her house to sale our gifts from handmade to homemade baked and cooked goods. This was my first holiday boutique. Very good turn out and great experience. Met some wonderful people too. I am a city girl but I do love my new town and we are coming up on four years since we moved here.  I got to talk with some vendors and the local towns people who came. Gotta say these mountain communities have grown on me and I love it here and now gotta prepare for March's boutique.

These are some of the items I made to sale
Enjoy


Handmade ornament from pieces of fabric and used Mod Podge 


Slotted Wood Clothespins 
Ballerinas and Soldiers 

Magnets


Chocolate Trays 

Altered Clothespins and snowman clothespins 
Love this
Strike every where matches in a jar with sand paper on lid to strike the match on

Holiday pencils for stocking stuffer 

Nugget Tray Stocking stuffer (cardstock,pretzel bag,ribbon and tag)

Melted Crayons in muffin pan great stocking stuffer for kids

Simple gift glass tea light holders with tea lights 


 Oil base paint pen used to paint the mugs then let dry over night or at least 8 hours and then put in over at 350 F for 45 minutes.
Recycled Baby food Jars turned into votives 

Saturday, November 22, 2014

DIY Gift Jar Packaging

I have been busy lately getting ready for a Christmas Holiday craft boutique coming up next month. I just wanted to show a simple easy way to dress up your holiday gifts in a jar by making your own tags.

The tags can be printed out by finding a template or hand drawing any shape on to cardstock and cutting it out. Cardstock paper is thicker  than regular printer paper or contruction paper.  I just traced my label stamp and punched  a hole and added to both sides of the punch out hole reinforcements and threaded some twine that I got in the dollar section at target. Then just tie it around the neck of your preferred glass jar. I like these Kerr quilted jelly jars. I stamped "Joy" to the tag and on the other side you can hand write "To" "From". It gives it a personal touch to your gifts in a jar or any other gift.

This one is one of the simplest and easy gift packaging ideaa so don't be affraid if it's not perfect. That is the beauty of handmade crafts.

Thursday, November 20, 2014

Upcycled Tin Cans

Next time before throwing out a soup can think about the ideas you can do with them. I usually put the medium to larger size cans aside. I usually just run them through hot soapy water and add the blue dawn soap to remove the labels. But there is always sticky glue left so my trick is to use household items. All you need is equal parts cooking oil of any kind and baking soda and just rub the cans and let it sit for a few minutes. At this point I go do other things like fold laundry and then i come back to them. Then I just use a wire sponge or regular sponge. The oil helps losen up the residue and the baking soda acts like an abrassor and this works well with glass jars too. These tin cans I let my daughter paint and she planted her own flowers in them. It's a way to teach her a little responsinility by watering her plants daily and keep her busy. 

Wednesday, May 28, 2014

DIY Garden sign using reclaimed wood

I have been gone for a while,focussing on myself and my little family. I am back and happier than I could be. I have been doing a lot of cleaning outside from it being so windy up here these past couple of months,there was a lot of branches and leafs every where,but now it's nice and sunny and warm. That said I'd like to share one of my many projects that i have been waiting to do.

I gave it a quick painting with white spray paint. i just sprayed across once really quick and i gave it a light sanding to give it more of an older look. Then
I wrote
"mommy's garden" with a pencil and i painted it in with acrylic paint,then
I just nailed it to that wood pole. 

Thursday, November 28, 2013

Pine cone turkey

I picked a lot of pine cones around my neighborhood with my daughter for up coming Christmas crafts but I wanted to do something for tomorrow's Thanksgiving dinner so I went on google and there were so many ideas,and i saw people made these pine cone turkeys. Perfect! Its fun,easy and simple and its a fun kids project too.
Supplies
1.pine cones
2.red,yellow and orange card stock or construction paper. I only used two colors.
3. Googly eyes (mine are from the dollar tree)
4. Something to glue down the items,I used hot glue.
The possibilities are endless as far as materials for the turkey,if you have feathers that would look pretty too,or trace your child's hands for the feathers and color it. This cost me nothing since i already had the supplies,but if you don't the dollar store always has construction paper and googly eyes.

Sunday, November 10, 2013

DIY Cinder block bench (pinterest Idea)


Cinder Block Bench
I saw that I had lots of cinder blocks behind my shed and some reclaimed wood, so I searched on pinterest projects that use reclaimed wood and cinder blocks. There were a lot of great ideas, but they needed other supplies that I didn't have and wasn't about to go spending money. So then I came across this cinder block bench and they used 4 4x4x10 pieces of lumber and 12 cinder blocks. I used 14 blocks and reclaimed wood I just threw on top with a cushion and some throw pillows. 

This was the bench I saw on The Basement Blog that seemed more around my alley and my budget (free)

 
Below is the one I saw on Pinterest which I'm sure a lot of you have seen too, don't get me wrong it's lovely but I didn't have that many blocks to try and recreate this look, so I worked with what I had on hand around my house already. Mine is not as lovely but it's functional and budget friendly. If you do not want to spend the money on blocks you can always go to craiglist or http://www.freecycle.org and search in your area.


Monday, May 20, 2013

Diy apothecary candy jar

This project is so simple to make. You can use all types of glass jars or bowls. I simply glued the bowl to the candlestick holder. Both items i found at the thrift store for a dollar each. If you don't have a white candlestick holder you can always paint it and they sale them at the dollar store. I also used E6000 glue and i left the bowl and candlestick holder together over night just to ensure a snug fit.

Sunday, February 17, 2013

Painted old tray

I have this old tray from Easter and I don't like the pastel colors on it anymore. I decided to paint it a bold bright yellow with some thick aqua and turquoise stripes and a bird on a branch. The yellow paint is a sample size from the hardware store only ran me about 3 dollars. The other acrylic paint I have pictured is from walmart and those were 1 dollar a piece. The acrylic clear coat can was almost 5 dollars. It's the cheapest one I found. Finally the stencil is just a print out of a bird on card stock I have on hand that I cut out with an Xacto knife.  What I like about trays is that they serve many purposes. You can put it on your coffee table to hold books or simply your coffee essentials,or makeup ,wallets. The possibilities are endless.

Friday, February 1, 2013

Pantry makeover in progress

So I have painted the shelves so I am just waiting on them to dry. At this point I am not sure if I will paint the back or put shelf liner that I have . I have a couple designs but I would have to sleep on it and I will be putting some small storage baskets to organize the food and other items I have in there. Can not wait yay.