Pages

Saturday, April 4, 2015

Shaving cream Dyed Easter Eggs

One more day away from Easter Sunday.
Today is a busy day getting baskets done and cleaning the house. I spent most of my day yesterday in the city running errands.
Once we got home we settled in,unloaded groceries and took a quick nap.
We bought the plain easter eggs from Walmart a while back,but I picked up another pack yesterday.

I decided to dye the eggs with shaving cream,it works a ton better with these eggs. The liquid version not so much,unless you like really faint colors or have time to let them dry and coat them another three times {not me :) }.
I am so sorry I didn`t take pictures of the process,but it is very simple.

Use any brand of the white foam shaving cream. If you want to do different colors,get seperate bowls for each. I used the food coloring that comes with four different colors that can be used for egg dying as well. I used the neon colors and used the blue and green to make turquoise. I started off with a couple drops of each and mixed it with the shaving cream to see if I was happy with the color. I just eye balled it,but start with one drop or two and mix if it needs more ,add one drop at a time until you get your desired color,you do this for each bowl if you are doing different colors.
Now the next part you want to put on disposable gloves or your dish washing gloves.
Use a rag that you do not mind staining,using napkins is messy and you'd be wasting a lot.

Now drop in a few eggs into one bowl and rub the shaving cream on each egg,you will see them change quickly.

Once you are done with the few you put in. Grab one at a time and take the excess off and clean any cream left on it with the rag. Do not rinse them because you will wash off the dye. Repeat this step until you are done with one color and place the eggs on a plate or flat surface to air dry. They are not wet but any moisture from the shaving cream you want to let it dry. hope you enjoy doing this with your kids,just remember to wear gloves it is pretty messy,but it's not fun with no mess right? 
Enjoy

Wednesday, April 1, 2015

Easter Wreath

So here is the Easter wreath I made with the pinwheels I showed you guys that I made. I like it, it's simple and I can still use this wreath after Easter, just tweak a few things,remove the wood bunny ornament. Isn't just darling, my luck I always find one left of what ever it is that I want to get more of at the dollar spot at Target. It come with 6 or 8 of these wood bunnies. The Burlap I purchased at Walmart, which they have different selections even, by the yard. The Green Burlap ribbon I actually purchased at the dollar tree and yup it was the last one. I am hoping to find some more again. The yellow polka dot wired ribbon, I also purchased at the dollar tree, and the little eggs you can find them at the dollar tree or the 99 cents only stores. I found blank ones at the 99 Cents Only Store as well which I like because you can paint,decorate and do many things with them.
Oh, and the wreath itself I also purchased at the dollar tree. Surprisingly, they are sturdy.
I have a few other wreaths,but I am saving those for other projects that I will blog about soon.
 Hope you all like the wreath,and remember there are no right or wrong ways to making a wreath. You can add just about anything.


Paper Pinwheels

I got the idea to make my own paper pinwheels from Target's dollar spot.
A week ago when I went in, they had so many cute pinwheels that I said I'll get them on Thursday,only two days away. Bad Idea,I only found two,and only one had the cute light spring colors that I wanted. I am hoping I find some more when I go on Friday. So instead I made a couple paper pinwheels for my wreath.

I used the 6x6 paper pads to make these, I have included pictures to help you guide.
You can use paper that is double sided with pattern,single color or like myself,with one pattern on the front. I placed the paper with the pattern down so the white is up. I folded one corner to the other one,creating a triangle,then you open it, and repeat the same step but opposite side. when you open it, you will have four creases that create four triangles. Now this next part is not hard,but you have to go easy on the cutting when you get close to the center. You don't want to cut all the way through. So it looks like a big X when you cut it.  Now from here you can use glue stick,glue gun ,or the sticky dots which I used.  I placed one sticky dot in the middle and placed the right corner of one of the triangles, then I placed another sticky dot on top of the one I just folded in, and I kept repeating that until I was done. So you will either fold all the right corners to the center or all the left corners to the center,it doesn't matter,but you can not fold one right,then one left,because then it doesn't create a pinwheel. I hope I didn't confuse you. I think I made it sound more complicated than it really is right?


Saturday, March 28, 2015

Faux Flower Decor

Home Decor does not have to be pricey. Hold off temptations to buy that floral arrangement for $16, and you can make one at your own taste. Depending where there are sales or clearance on floral supplies, it can be at Walmart,Michael's stores or Joanne's or even the dollar store. For this simple arrangement I purchased the floral foam blocks at the dollar tree, as well as the pink roses.  I then cut the block in half to fit in this vintage milk vase or Goblet Chalice. I then cut off some of the stems to make them shorter and that is it. Very simple and chic. 
You would be surprised at the amount of floral supplies the Dollar Tree carries.
If I ever see any real Milk vases I will grab them, especially if they are inexpensive. 


Monday, March 2, 2015

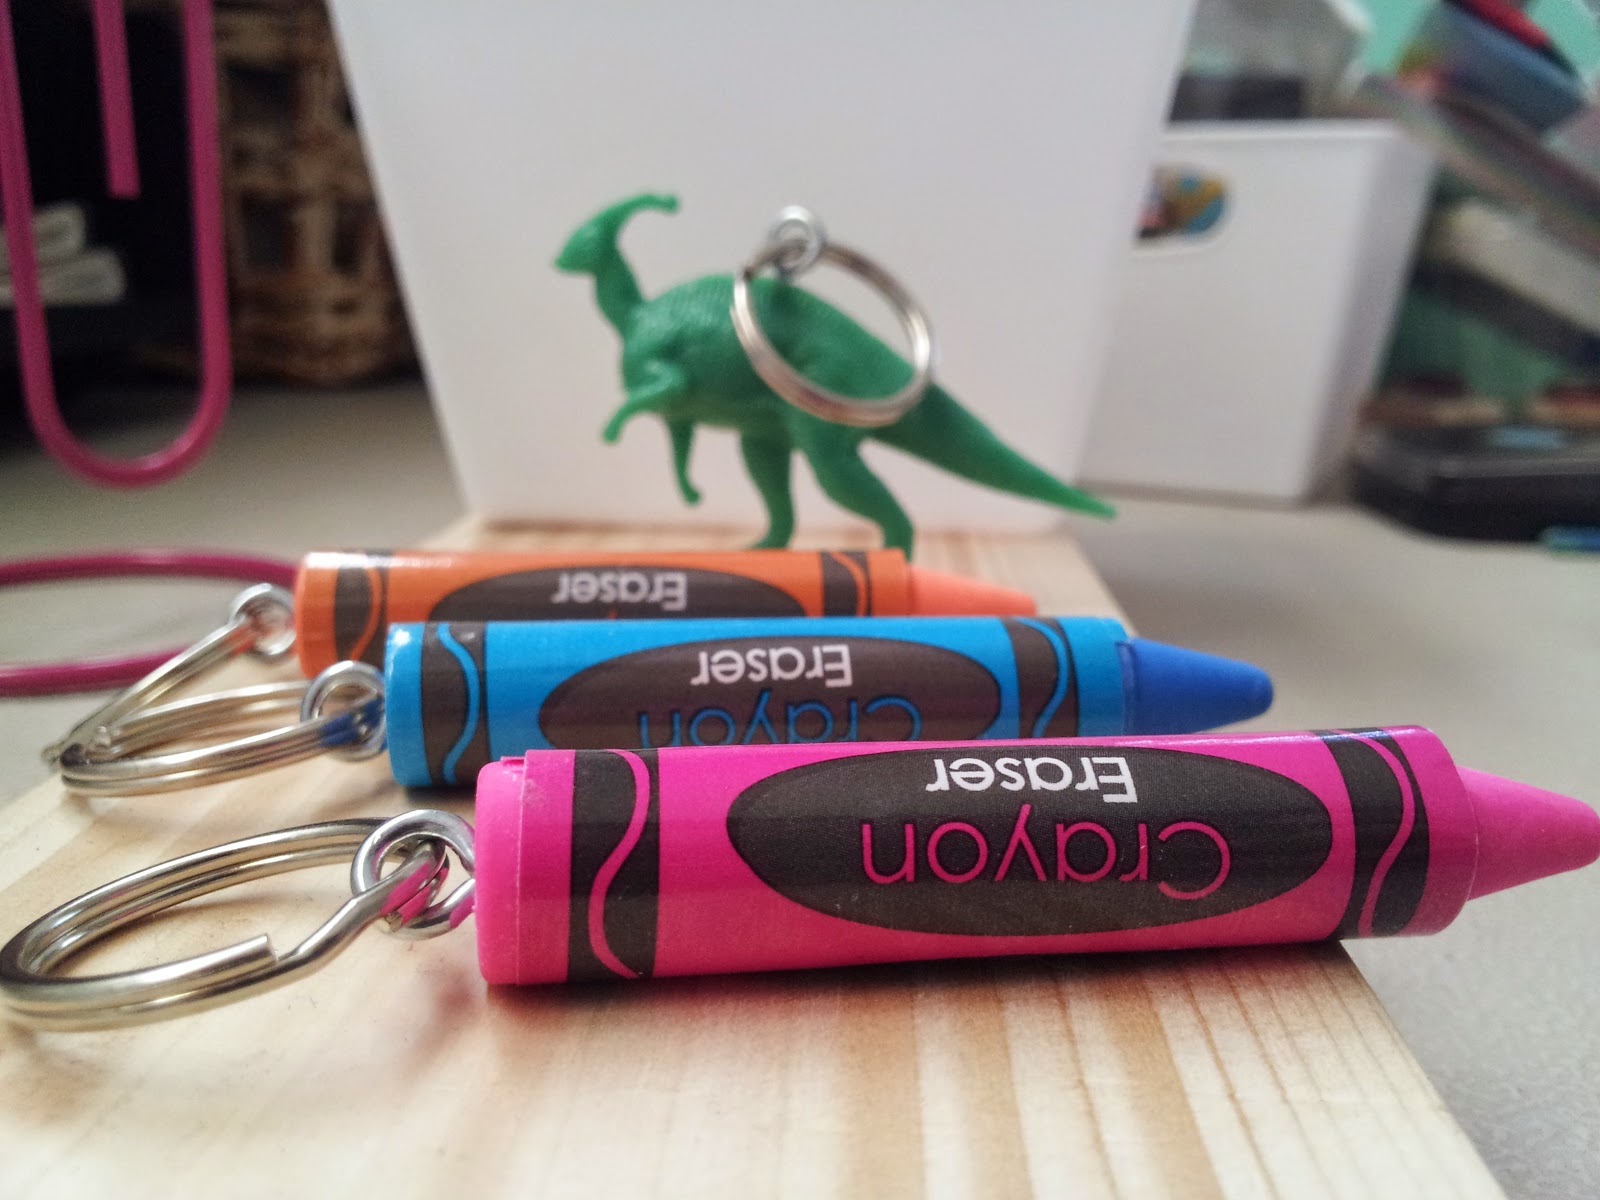
DIY Key Chains

I had so much fun making these key chains from rubber crayon erasers and plastic dinosaurs.
I have had them for a while and didn't know what to do with them and I wanted to make some key chains a few days ago and I saw in front of me the eye screws and I said ta da!!
Really easy and fun to make. The eye screws you can find them pretty much at any hardware store, at the dollar tree, 99 cents only store, Walmart,Target, and the rings I got them at Walmart in their craft section.
Now I want to make more and look for more fun rubber and plastic items that I can easily turn into key chains.


Bird Houses

The Spring boutique is getting closer and I am starting to stress aaahhh, but I am also very excited.
The weather up here has been really cold with rain,slush,snow and some more rain. Further up the mountain there is a lot of snow. We usually go for a hike to Mt. Pinos on the trails but it is cloudy and too cold so maybe tomorrow or Wednesday we can go.

As for right now, I am stuck indoors which is perfect and gives me no excuse to do other things and stick to my schedule and get a lot done. With cleaning,cooking,taking care of my little girls needs I have to put some time in there for my things. 

How I keep her busy when I am working is giving her scraps of paper and glue or some thread and scraps of fabric. That usually keeps her occupied for a good 30 minutes,yeah not very long,so then I have to give her something else to do while I try to finish. She usually asks me "mommy can I help you". In most cases I let her but for these things I am making to sale at the spring boutique I have to explain to her she can not, but she can help me by making pieces of her own art. 

So far I have items half way done like these cute little bird houses that I just painted the roofs and I let them dry over night and then I left for the weekend to my parents house and they stayed like this, so now I have to go and finish them while Makenzie is watching her dad play his video game. 


Monday, February 23, 2015

Chalkboard Frame


I love picture frames and I always take a look at the picture frame area at the thrift store.
You can never have too many right. They are cute as party decor,jewelry holder,picture holder with the mini clothespins or just as a chalkboard. This is a mini chalkboard message board,I change the word or phrase every week and just have fun with it.
I usually spray paint my picture frames and revamp them,but this one just needed a little cleaning and I love the detail and color.
Other than that I just spray painted the glass with chalk paint,very inexpensive at Walmart under four dollars per can.

Wednesday, February 11, 2015

Craft stick bracelet

I have seen so many wonderdul ideas on Pinterest, but the possibilities are endless with these. You can make big or small bracelets using different size craft sticks or popscicle sticks. I just need to buy a sturdy string in the jewelry section.

Below is a couple pictures on how I painted them so they come out with almost clean lines.

Friday, February 6, 2015

Wall decor

I love picture frames and left over pieces of wood that I can use to make wall decor. The frames I purchased at Michaels for only $1.00 each and I just had fun with the colors. The other one I wanted to leave plain with just the stripes,but then I looked in front of me the tacks and I thought for a minute what designnI should use. Hello, it's February. I just slightly traced a heart shape and thumb tacked my way.

Wood is amazing,you can do so many things with it,but it's the "what should I make with it" the tricky part.
What should I make? Simple,what ever it is that you need or could use or even want. My thing is, work with what you have and work from there. What I have done is buy things here and there with out the pressure of over spending or breaking my wallet.

Monday, February 2, 2015

Target dollar spot

Going to Target I always take a look at their dollar spot but they have items too for $3, but they are super cute too.
Since Valentine's day is next week I bought a few things to make some crafts with my daughter and a couple other crafts for some gift baskets.
I also bought a few cute journals and this cute glass jar that I don't know what I will use it for. You can use it to put lotion or homemade products like sugar scrubs and bath salts.
I also saw some cute activities for the kids, like money and coins and flash cards for one dollar. It's a great deal because kids will be kids and accidents happen or they loose things so you won't feel too bad if that happens.

Saturday, January 10, 2015

I love Tin Cans

I am always saving Tin cans,and once you wash them well they look nice and shiny.
I just use hot soapy water to remove the sticky glue left behind from the labels and some baking soda it's an abrasive and helps remove that gunk but sometimes I need help from my wire sponge or what ever those things are called.
I have used them for flower vases at birthday party's, pots for plants,lanterns for the outdoors during the summer. I mean the possibilities are endless,so I always keep at least a couple bags with these babies and they range in sizes too,which I love. Recently for the winter I have no flowers up here on the Mountain but my mother in law has some rosemary that I cut and just put it in water and it smells and looks great,plus I like to stuff my whole chickens with an onion and some rosemary and make some rosemary oil.
I know it's easy to just throw away in the trash but trust me,next time just save a couple and see what you can use them for.


Dollar Store Mirror Decor


Sometimes I buy things at the dollar store,Michael's or thrift store because they are great finds and I know I will regret not buying it later and it won't be there when I come back for it, and like a lot of the times I am busy and never get around to finishing something or I end up doing another project instead, or if I do finish my projects I forget to post it up on here and I remind myself with post it's on the fridge but someone how they manage to disappear,not my fault I promise he he he.  I am doing better and trying to keep up with my facebook page,Pinterest,Instagram and of course my blog. 
Well enough about excuses, but here is a project you can do with any kind of mirrors you find, the key is the glue especially for glass that you do not want it to fall apart. My secret is the E6000 glue and it dries clear. It is very versatile and I always keep at least two around. These framed mirrors you can find at the dollar tree or 99 Cents Only Stores and the wood letter I picked up at Walmart for less than $1.50 and the Glue too they sale at Walmart or any craft store for under $4.00, just depending where you get it at price may vary. 

You can paint them any color you want, these were white to begin with and still look white but I did apply a coat of a very light gray bluish paint that is very light,but you can not tell in this picture very well. And of course I painted the wood letter to give it a shabby chic look to it. For the letter I primed it first,then I put a coat of like a light ever green acrylic pain color and after that dried I added a light pink coat to the top. Once it all dried up I gave it a quick sand with a sanding sponge to reveal some of the paint beneath to give it taht old look and then I glued the letter using the E6000 Glue and I let the whole thing dry over night. 
The frames actually already come with hanging brackets on the back in case you want to hang it, you won't need to add any,or you can just stand it on a bookcase or on top of the fireplace mantle. Next time you go into a dollar store don't forget to snag a few of the mirrors. 


Thursday, January 8, 2015

Wood Crosses

I love how these wood crosses turned out. I had a client who wanted something handmade and unique and I kept thinking and thinking on what and I asked her what her mom and uncle liked and she said they both like crosses and I already had kindling that I had bought and wood shims that I used. They were not hard to make but it took time to cut,sand,paint,nail and glue a lot of the pieces that went into making these crosses.
She wanted them for Christmas so I had about a week or less to make them but I was more than excited and happy to make them and she loved them which is what matters.


Dollar Store Chalk board tray

Chalk paint is so much fun. It is very versatile and so many things you can turn into a chalk board.
I love trays and I love going to the dollar Tree they carry these trays that look like the real thing but for the fraction of the price.
I simply used the blue painters tape and taped around the center to prevent any of the paint from getting on the outside. for this tray I did two coats of chalk paint and I used Krylon spray paint.

I found these awesome chalk markers at the 99 cent only store and I had to stock up on these because a lot of the times they run out or only carry them for a limited time. With these kind of chalk Markers it is permanent once it dries but it is washable with soapy moist cloth before it dries. Or you can simply use regular chalk. Before I write on these I like to use the flat part of the chalk and gently cover it with the chalk and wipe it off. I don't know the term I forgot what it is called when you apply the chalk all over the chalk board.
This whole project cost me under $3.00 because I had the spray paint on hand, but if you do not they have chalk paint at walmart for under $5.00 a can. I usually get mine at Walmart but If I don't go to the city and won't be going there soon I usually just go to Ace here in town.

Hello and Happy New Year

Well Happy New year hope everyone had a good new year with their loved ones.
We just spent it at home since our daughter got sick but my sister and brother got to come up here with us and spend a few days up on the mountain.
I have been busy the past couple of months and I took a little break, and the Tuesday before New Year’s Eve my little girl got sick. We took her to her doctor’s office and they did a breathing treatment because her oxygen levels were low and her doctor thought she might have phnemonia so we then took her to Children’s Hospital in Los Angeles just to be on the safe side. Upon arrival we checked her in and checked her oxygen level and it was low so they did another treatment. But they finally got her oxygen levels up and she has asthma with an infection. She had the same thing last year right around this time. She has ezcema and some food allergies and allergies to certain environmental factors. We take her regularly for check ups with her amazing Pedetrician dermatologist at UCLA and kids with allergies are more pron to have asthma sometime in their life. The awesome thing is that the doctors their work hand on hand to figure out a plan and what is better for the child. So now we need to get the allergist involved and see if this is going to be a problem yearly when the winter comes around. Living in the city there is more poor air quality. Idealy living on the beach or near the beach would be better but that is not going to happen any time soon. For now we just continue doing what we do to manage her allergies and ezcema.

P15_0ef13bfb-24e4-41d7-86c8-01f13873f393.jpg


                                                      some of the mugs I made my family

A few of the ornaments I made from slotted wood clothespins and craft wood pieces from the dollar tree
and foam balls covered with yarn.


Monday, December 15, 2014

13 days til Christmas boutique

This past Saturday the 13th was the first Christmas boutique held at a local vendors home and my first time selling my items. There wasn't the yearly christmas fair after the parade not sure if we lost a major sponsor. But that did not stop us from the holiday spirit. A very lovely lady was so nice of her to let us use her house to sale our gifts from handmade to homemade baked and cooked goods. This was my first holiday boutique. Very good turn out and great experience. Met some wonderful people too. I am a city girl but I do love my new town and we are coming up on four years since we moved here.  I got to talk with some vendors and the local towns people who came. Gotta say these mountain communities have grown on me and I love it here and now gotta prepare for March's boutique.

These are some of the items I made to sale
Enjoy


Handmade ornament from pieces of fabric and used Mod Podge 


Slotted Wood Clothespins 
Ballerinas and Soldiers 

Magnets


Chocolate Trays 

Altered Clothespins and snowman clothespins 
Love this
Strike every where matches in a jar with sand paper on lid to strike the match on

Holiday pencils for stocking stuffer 

Nugget Tray Stocking stuffer (cardstock,pretzel bag,ribbon and tag)

Melted Crayons in muffin pan great stocking stuffer for kids

Simple gift glass tea light holders with tea lights 


 Oil base paint pen used to paint the mugs then let dry over night or at least 8 hours and then put in over at 350 F for 45 minutes.
Recycled Baby food Jars turned into votives